Autoexec can be very helpful, you just need to know a little bit about commands and configs. If you don't trust Valve that your settings are saved after the game closes, having an Autoexec that will load your settings every time you start the game is nice. Here is how to create an Autoexec and some uses for it.

If you know some commands and configs in CS2, having an Autoexec will make your life much easier. It will launch a config in your game files the moment you press on “play CS2”. If all of this sounds too complicated for you, remain with us, it's much simpler than it sounds.
How To Create An Autoexec In CS2

Here's a step-by-step guide on how to create an Autoexec in CS2:
- Open your Steam Library and search for CS2
- Right-click it and select “Properties”
- Go to “Installed Files” and click on “Browse” in the top right
- Click on “game”, then “csgo” and then “cfg”
- Right click, select “new” and create a new text file
- Name the text file “[NAME].cfg” and confirm, that you are changing the filename to .cfg
- Open the .cfg and add the commands you want as an Autoexec
- Save the file and close the folder
- Go back to Steam and right click CS2 again
- Head to “Properties” once again
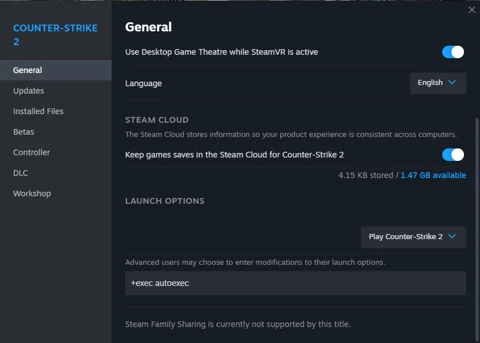
- In “General” scroll down to “launch options”
- type in “+exec [NAME].cfg”
If you've done all the steps correct, your Autoexec will run as soon as the game launches.
Use Cases For An Autoexec

There are a handful of options what you can use an Autoexec for. Here are some examples:
- For a Jump Throw or Run-Throw Bind
- To load your settings, making sure that Valve can't mess with them!
- Movement keybinds
- Buyscripts
- Crosshair-changes bound to a key
So, there are a multitude of good reasons to know what an Autoexec is and how to use it. For more great guides and news on CS2, make sure to stay with us here on EarlyGame!


